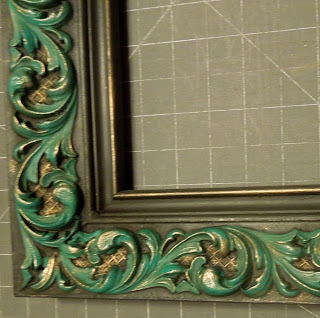
Nancy has been collecting frames for our "Fancy Frame" workshop. I was looking through them yesterday and this one just caught my eye. I loved all the carving and it was a size I felt comfortable practicing on. It wasn't as hard to do as I thought it would be.. it was actually very relaxing and fun.
There's a little prep before you begin. Remove all the paper that's covering the back of the frame. Just peel it off, glue and all. Then remove the staples that hold in the picture and glass. Set the glass aside if you plan on using it when your frame is complete. If the back has hooks to hold in the photo and they're the re-usable kind, save them as well.
The paint is up to you, you can have as many colors as you like. For this project I chose black mixed with a little white to get a nice charcoal. And used a teal that I already had. I mixed the Websters Chalk Paint Powder into the black mixture and gave it a good shake. The teal was already a chalk paint. Now to the fun part: The photo ABOVE shows the first two steps. I painted the entire frame the charcoal color in two coats. Let it dry for about 15 minutes. With chalk paint you can tell when it's totally dry, it gets very dull and powdery looking. Second step was to start painting the carved areas in the teal. This required a small brush and a little glass of water. The water helps make the paint a bit thinner consistency for easier spreading. I followed the lines, if you miss a little, no problem. I just try to do only the raised areas in the teal.
Step Three: (Photo above) When you have all the raised areas painted teal and they're dry, now you apply the wax. I chose to use the dark wax directly on the paint. Normally, you would apply a clear coat of wax first so that the deep pigment of the dark wax does not turn your paint black. I wanted to tone down the teal color a bit, so I didn't use the clear coat. I brushed it on and made sure I got it into all nooks and crannys. After letting it sit for about a minute, using another soft piece of towel, I removed any excess wax on top of the carving. By leaving some of the wax in the nooks you get a more dimensional feel to your work. After the first wipe down I waited a few minutes and then gave it a buff with the towel to bring out the shine.
The final step was to add the gilding wax. This is done with a brush and is applied very lightly. I put a tiny pin head size spot on the edge of the leaf and with my finger wipe it on. Basically you spread it with your finger to get the wax applied softly and exactly where you want it to go. I went for more of an outline than a full gilding. For my personal taste, less is more when it comes to the gold or silver gilding wax. I like it to be a little subtle.
It took me about 3 hours to get this totally done. Since I want to use it for my workshop I left it in stages, it looks strange with the top still just dull charcoal. It'll make a nice sample to help with the visual points. My next one will be completely finished. I think I'll pickup another when I stop in the shop today. The Super Bowl is on tonight and I think I'll paint while Jeff enjoys the game.
If you'd like to join us and make a frame for your home. Sign up for our "Fancy Frames" workshop. Wednesday, February 27th 6:00 PM - 8:30 PM. We'll be learning several fun techniques to transform even the plainest of frames.
Patti


No comments:
Post a Comment