Wednesday, February 27, 2013

Quilt, Table Runner and Topper Sale

                                                       Fall Quilt  62" x 82"    $150

We are having a quilt sale. Denise Hall of D.Hall Designs has brought in some of her fantastic quilts, runners, toppers and pillows to sell. Many of my customers from Fabric Town knew Denise, she is a local designer and we carried her patterns. She also did long arm quilting for us from time to time.

All the quilts shown are for sale at the shop starting tomorrow. Along with the quilts, Denise has also brought in a wonderful selection of table runners, toppers and pillows.

Batik Quilt  71" x 89"     $200

Purple Floral Quilt  73" x 96"   $200

Minnesota Loon Quilt  70" x 92"  $200

Table runner and topper sets  $40  (many different patterns perfect for Spring)

Scrappy Rails Quilt  64" x 76"     $150

Minnesota Pillow (MN State Shop hop fabric)  $35.

Winter Pinecone Quilt   54" x 74"  $150

Thursday, February 21, 2013

A beautiful transformation


We open today at 10:00 AM. This lovely bedroom set is on the floor and available for adoption.

When setting up the display, I was thinking that it would work in a childs room or if you have a smaller size bedroom - maybe guest room, it would be perfect.

The bed is a Twin size. I love the headboard and little footboard, but especially the sculptured side rails. A nice quilt tucked in around the mattress so you can see the rails would be like framing the quilt.

4 drawer chest and accent chair make it a set. We added the vintage white and cream dresser to give a more neutral shade to the mix.

Hope you enjoyed this transformation. We enjoy doing them and sharing them with you.

They say there's a storm coming tonight.... be safe and warm.

Take care,
Patti


Tuesday, February 19, 2013

Re-furbishing and Re-purposing

Good Morning,

It's 5:00 AM and I'm awake. I've been up since about 3:30 with things going through my mind.

Did you ever have a million really fun ideas that you want to try, but not enough time? That's what I'm going through. Spring is coming and I would like to make up some really cute things for the shop. I have a lot of the materials at hand, I have a space to do it but for the life of me, I can't find on the Internet a place that sells "Extra hours in a day".

Our shop is keeping us really busy. We are finding that people are truly enjoying our furniture. We have finally gotten into our groove. We're open on Thursday through Sunday, the other days we are literally.. re-furbishing and re-purposing.

We start on Sunday night when the shop closes, moving things around and filling in the spots left from the sold pieces. We assess what we need to do to fill the voids and complete each section. I love it when a customer says, "I can't believe that occasional shops re-arrange their shop every month", I laugh, we do it every week.

On our off days, Nancy goes to auctions, thrift shops and other little outlets. She enjoys the hunt. I on the other hand, like the hunt but love the transformation part. It's really fulfilling to take a once lovely antique or vintage piece and bring it back to a condition that make people want to treasure it again. When I look at some of the pieces that Nan finds, I can see their past. I realize that sounds a little over the edge. What I mean is some of these worn and damaged pieces were fabulous when new. I can imagine how proud the original owner must have been when they placed it in their homes. A vintage buffet that has chipping veneer, gouges on the top and the drawers don't close correctly, at one time was probably the highlight of the dining room. So many of the things we work on remind us of our Grandmother or Nana. They had the lovely dining room sets, the fantastic hutches and more.

As a child it was just Grandma furniture, you didn't give it much thought. Now, that's another story. I can truly appreciate the styles and workmanship that went into each individual piece. Funny how much you change your opinion of things as you age.

Yesterday, we went and picked out fabrics. I have a great collection of chairs to makeover and the seats need to be re-upholstered. I'm slowly learning how to re-do seats. Nothing fancy, just cover plain cushions. A little paint and new fabric and a worn out chair comes alive again. It's fun to do, and I just got some really fun fabrics.. large floral prints and a few contemporary. We'll see, I start on them today.

I guess that's all for today. Hope you all have a creative week.

Patti

Saturday, February 9, 2013

To paint or not to paint.. that is the question.

 We get asked this question almost every day, "Do you paint every piece of furniture you get in?"   Infact, some people that stop in are not very happy that we paint the wood instead of stripping it down.

The answer to that question is No and Yes. I'm sure that sounds a little contradictory. The truth is, if it's in great shape we polish it up and put it on the floor in it's original condition. 

By the time most pieces get to our shop, they are in need of some TLC, spackle, sanding and gluing. At that point we fix them and then paint them. 

The dresser pictured above is a case of the NO and Yes situation. We've had this wonderful vintage dresser in the shop since we opened in October. The only comments we ever heard about it was - "It looks like old Grandma furniture".  Nobody was even really looking at the beautiful wood. The mirror is old so the silver is starting to crackle. Once again, it's vintage and that's part of it's charm.  So what was needed?  As much as I hated to think of painting it, and it took me a very long time to even consider it, something was needed to make it desirable again.

I sat one morning and looked at it, in hopes that I would come up with an answer that worked for the painted and non-painted choice. It just hit me, a bit of color on the top and drawer fronts. Nothing else. The top was scratched from years of use and the drawers had a few digs in them. So I got out the wood filler and putty knife and went to work. Filled in all the digs, scratches and gouges. Sanded them smooth and then the color came to me.... Red.  

 
I love Red, probably one of my favorite colors.  Now it came time to put the paint on the wood.... I held my breath and made my first swipe. The red against the stained wood was so rich and warm looking. I did the drawers - leaving the wood knobs unpainted.

After it dried, I used Miss Mustard Seed's Wax. WOW.. what a difference that little bit of color made. It went from just a Grandma dresser to one that would go in so many different settings. As of today, it's gotten a lot more attention. I have a feeling it won't be in the shop for long.

We are all about giving each piece we get in the opportunity to shine. I like to think of it this way, Most woman put on makeup to put their best face forward.. the same for our furniture, we just put the lipstick on them and make them ready for their "Next Act".

Patti

Sunday, February 3, 2013

Fancy Frames


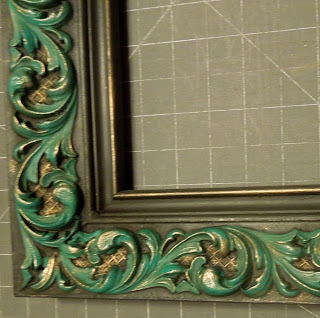
Nancy has been collecting frames for our "Fancy Frame" workshop. I was looking through them yesterday and this one just caught my eye. I loved all the carving and it was a size I felt comfortable practicing on. It wasn't as hard to do as I thought it would be.. it was actually very relaxing and fun.

There's a little prep before you begin. Remove all the paper that's covering the back of the frame. Just peel it off, glue and all. Then remove the staples that hold in the picture and glass. Set the glass aside if you plan on using it when your frame is complete. If the back has hooks to hold in the photo and they're the re-usable kind, save them as well.

The paint is up to you, you can have as many colors as you like. For this project I chose black mixed with a little white to get a nice charcoal. And used a teal that I already had. I mixed the Websters Chalk Paint Powder into the black mixture and gave it a good shake. The teal was already a chalk paint.  Now to the fun part:  The photo ABOVE shows the first two steps. I painted the entire frame the charcoal color in two coats. Let it dry for about 15 minutes. With chalk paint you can tell when it's totally dry, it gets very dull and powdery looking.  Second step was to start painting the carved areas in the teal. This required a small brush and a little glass of water. The water helps make the paint a bit thinner consistency for easier spreading. I followed the lines, if you miss a little, no problem. I just try to do only the raised areas in the teal.
 Step Three: (Photo above)  When you have all the raised areas painted teal and they're dry, now you apply the wax. I chose to use the dark wax directly on the paint. Normally, you would apply a clear coat of wax first so that the deep pigment of the dark wax does not turn your paint black. I wanted to tone down the teal color a bit, so I didn't use the clear coat. I brushed it on and made sure I got it into all nooks and crannys. After letting it sit for about a minute, using another soft piece of towel, I removed any excess wax on top of the carving. By leaving some of the wax in the nooks you get a more dimensional feel to your work. After the first wipe down I waited a few minutes and then gave it a buff with the towel to bring out the shine.


The final step was to add the gilding wax. This is done with a brush and is applied very lightly. I put a tiny pin head size spot on the edge of the leaf and with my finger wipe it on. Basically you spread it with your finger to get the wax applied softly and exactly where you want it to go. I went for more of an outline than a full gilding. For my personal taste, less is more when it comes to the gold or silver gilding wax. I like it to be a little subtle.

It took me about 3 hours to get this totally done. Since I want to use it for my workshop I left it in stages, it looks strange with the top still just dull charcoal. It'll make a nice sample to help with the visual points. My next one will be completely finished. I think I'll pickup another when I stop in the shop today. The Super Bowl is on tonight and I think I'll paint while Jeff enjoys the game.

If you'd like to join us and make a frame for your home. Sign up for our "Fancy Frames" workshop. Wednesday, February 27th  6:00 PM - 8:30 PM. We'll be learning several fun techniques to transform even the plainest of frames.

Patti

Friday, February 1, 2013

Today, UPS delivered our first shipment of Websters Chalk Paint Powder and Fiddes Waxes.
Anticipating the arrival, I had the little hutch top painted, two tone blue and the drop leaf table to match. As I had hoped, it made a great display.
It's pretty well known that we love "Miss Mustard Seeds Milk Paint" and always will. We just wanted to give you another option. Since we first started painting we've used a combination of Milk Paint and Chalk Paint. Both are wonderful and work beautifully when transforming our pieces. They each have their own uses and styles. I like Milk Paint if I want a more primitive or chippy look. Chalk Paint is a thicker more dense paint, it gives you a more solid coverage. Don't get me wrong, they both distress well, chip and look old. It just how you decide to apply each.
Before I promote any product, I need to believe in it. For awhile we have been testing Websters Chalk Paint Powder. The black desk is one of the examples we have in the shop (if it hasn't already sold). The paint is easy to mix, I put it in a Ball jar - powder and water, stirred it, added the latex paint - lid on and gave it about a 30 second vigorous shake. It mixes beautifully, smooth and creamy. When applied it seems to be self-leveling. No brush marks and a very even coverage with two coats. I was pleased at the amount of paint I had left over when the desk was finished, it went along way. I then followed it with Miss Mustard Seed's wax. Websters promotes Fiddes waxes, we do have them in stock - two colors. I have not had the chance to try it, it's not odorless and since we are painting inside I felt it would be better to wait until I could open the door. I will say, it is creamy to the touch and the brown is a wonderfully rich color. Hopefully, I will get to try it and give you my opinion soon.

The best part about Websters, actually there are a couple things.
 #1 - The cost is very reasonable, $13.95 for the bag of powder that will mix with a quart of latex.  The Fiddes wax is $18.95 and is a good size can.
#2 - The BESTEST part is that you are not limited to just a few colors. You can mix the Websters Chalk Paint Powder with ANY latex paint. That means that the sky is the limit when it comes to color or finish. You can use satin to gloss. No more being limited, think of the possibilities. I just stand in the paint section at Home Depot (my home away from home) and imagine all the pieces I can makeover and the fun colors. You can even take a color of something you like and have it matched. My preference is Behr paint. It has a built in primer and is a wonderful texture. 

If you'd like to learn more, stop in the shop and I'll be glad to show you just how easy it is to use. We also have a workshop schedule that outlines all our upcoming classes. We even have one called... First Friday Sit and Sip.  Guess what we do there? You guessed it, paint, sip wine and relax.

Come on in and become a do-it-yourselfer.
Patti